Back‑to‑school season is full of excitement—and what better way to celebrate than with delicious, themed cookies!
Whether you’re baking for a classroom party, preparing a teacher’s gift, or packing a lunchbox treat, these cookies bring smiles and festive vibes.
This article shares 12 delightful back‑to‑school cookie ideas, each with a simple description, ingredients list, and clear instructions. Let’s bake some joy!
1. Apple Sugar Cookies
These cookies are fun and iconic, shaped like bright red apples with a tiny green leaf on top. They make a wonderful treat for teacher appreciation or a cheerful surprise in a child’s lunchbox. The soft sugar cookie base paired with smooth icing makes them a delicious and eye-catching snack.

Ingredients
- Sugar cookie dough (standard recipe with butter, sugar, eggs, vanilla, flour, baking powder, salt)
- Royal icing
- Red and green food coloring
Instructions
Start by rolling out your sugar cookie dough on a floured surface and using an apple-shaped cookie cutter to cut out the cookies.
Place them on a baking sheet and bake at 350°F (175°C) for about 8–10 minutes, until the edges are just turning golden.
Let the cookies cool completely. Mix your icing and divide it into two bowls—color one red and the other green. Use the red icing to flood the surface of the cookies and let them dry fully.
Once the red icing has hardened, use the green icing to pipe a small leaf at the top and, optionally, add a brown stem if desired. Allow the decorations to set completely before serving or packaging.
2. Notebook or Loose-Leaf Paper Cookies
These cookies look just like notebook pages and are a playful treat for students. They are especially fun because you can write little messages or reminders on them using edible markers, making each one personal and interactive.

Ingredients
- Sugar cookie dough
- White royal icing
- Blue and red edible food pens or gels
Instructions
Roll out your dough and cut it into rectangles. Bake them in a preheated oven until lightly golden, then cool completely.
Cover each cookie with white icing and allow it to dry until smooth and firm.
Once the icing is dry, use blue edible markers to draw horizontal lines and a red marker to draw a vertical margin line down one side of the cookie.
You can also write short messages like “Good Luck!” or “Study Time” once the icing has fully set. Let the ink dry and store it in an airtight container.
3. Chalkboard Cookies
These cookies resemble miniature chalkboards and bring a nostalgic school theme. With a dark icing background and white writing, they look surprisingly realistic and are great for writing short messages of encouragement or giving to teachers.

Ingredients
- Sugar cookie dough
- Black or dark gray royal icing
- White icing or white edible pen
Instructions
Shape the cookies into rectangles or squares and bake them until golden around the edges. Once the cookies have cooled, flood the surface with black or dark gray icing and let it dry until matte and firm.
After that, use white icing or an edible pen to write small messages like “A+,” “Welcome,” or “Back to School.” Let the decorations dry completely before stacking or packaging them.
4. Pencil-Shaped Cookies
Pencil cookies are playful and bright, looking just like yellow pencils with pink erasers and gray tips. They are simple but eye-catching and will grab attention in any lunchbox or party tray.

Ingredients
- Sugar cookie dough
- Yellow, pink, gray, and brown icing
Instructions
Cut the dough into long rectangles or use a pencil-shaped cutter if available. Bake until light golden and let them cool.
Coat the main body of the cookie with yellow icing and let it dry.
Add a small section of gray icing at the pointed end to mimic the pencil lead, then pipe a narrow band of brown or black to separate the lead from the yellow part. At the top, add a pink rectangle to represent the eraser.
Allow all the icing to dry completely before moving or serving the cookies.
5. School Bus Cookies
These cheerful cookies are shaped like bright yellow school buses and are sure to bring back school memories for both kids and adults. The yellow icing, windows, and wheels make them look very realistic.

Ingredients
- Sugar cookie dough
- Yellow icing
- Black and red icing for wheels and lights
Instructions
Bake bus-shaped cookies and allow them to cool down. Cover each one with a thick layer of yellow icing and let it dry.
Add small circles of black icing at the bottom for wheels and use either white or gray icing for the windows.
Add tiny red dots for brake lights. Let each layer dry before adding the next detail so the colors stay clean and neat.
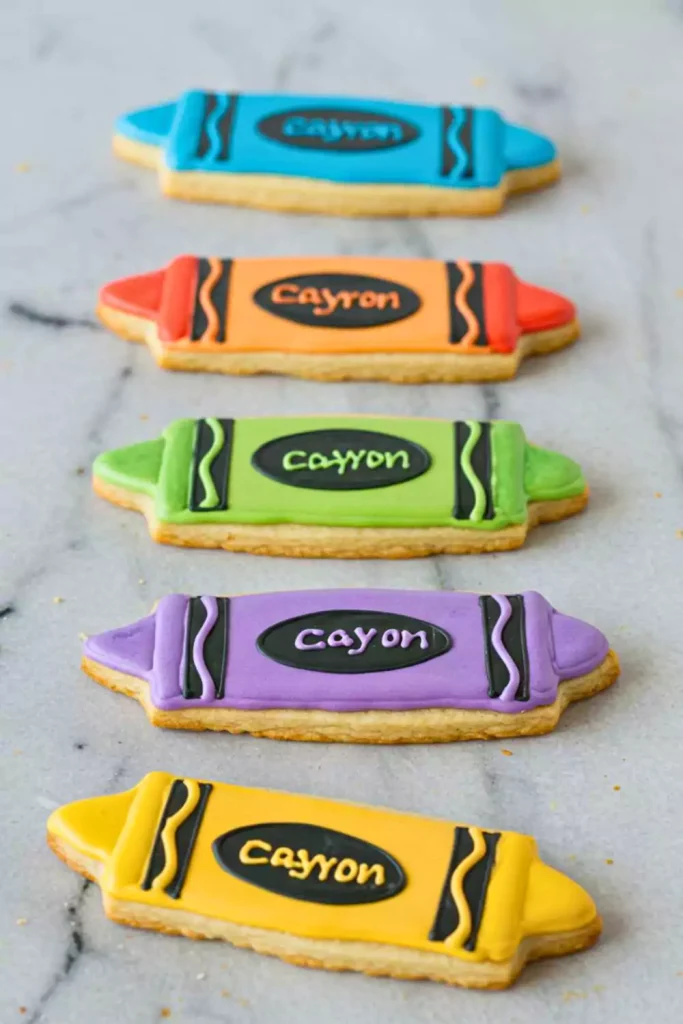
6. Crayon Cookies
Crayon cookies are a burst of color and are perfect for younger children. You can make them in different frosting colors, and they look fun when lined up together like a box of crayons.
Ingredients
- Sugar cookie dough
- Colored royal icings (multiple colors)
Instructions
Shape the dough into long bars or crayon shapes and bake them until set. When cooled, cover each cookie with a bright colored icing of your choice.
Once the base layer is dry, pipe a rectangle or oval shape in the middle with a contrasting color to resemble the crayon label.
Add small curved lines or squiggles at both ends to complete the crayon design. Allow them to dry completely before serving.
7. Smiley-Face Cookies
These cookies bring instant happiness. They’re easy to make and decorate with bright yellow circles and cheerful smiley faces. They’re great as an after-school treat or even to brighten up a lunchbox.

Ingredients
- Sugar cookie dough
- Yellow icing
- Black icing
Instructions
Bake circle-shaped cookies and let them cool. Flood the surface with yellow icing and let it dry to a smooth finish.
Use black icing to pipe two dots for eyes and a curved smile. These are quick to decorate, and you can make a large batch easily.
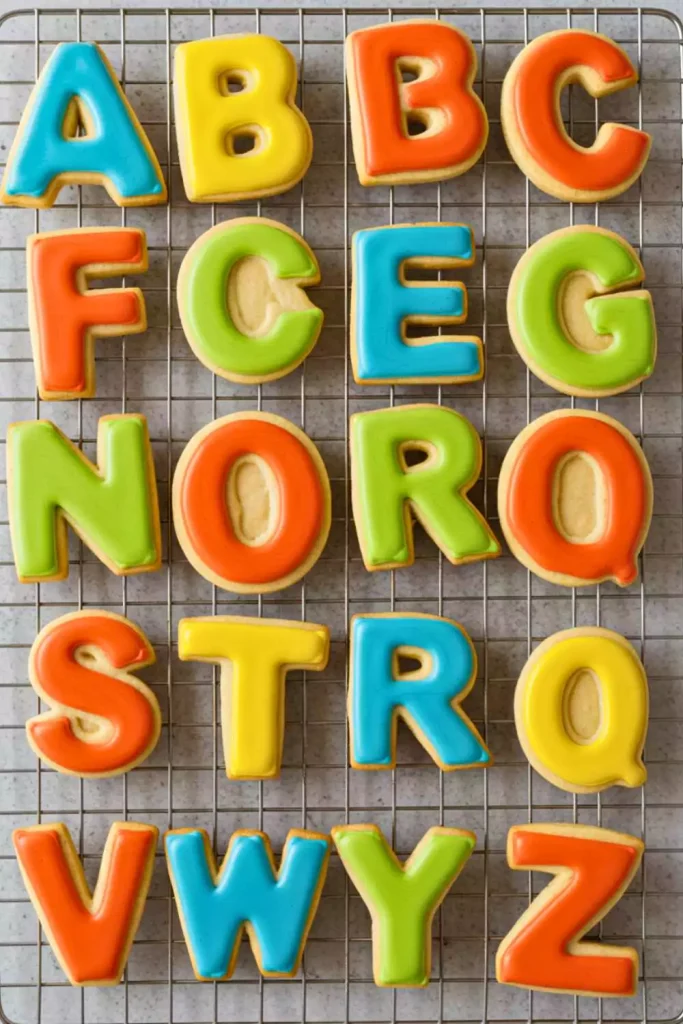
8. ABC Letter Cookies
These cookies are both educational and tasty. You can cut them into different letters and decorate them in a variety of colors, helping younger children recognize letters while enjoying a treat.
Ingredients
- Sugar cookie dough
- Various colored icings
Instructions
Roll out the dough and use alphabet cookie cutters to shape the cookies. Bake and cool them fully. Flood each cookie with icing in any color you like. Once dry, you can add extra decorations like polka dots, stripes, or small letters on top for added detail. Let the cookies dry before storing.
9. Checkerboard Cookies
These cookies look fancy with a checkerboard pattern of two colors. They are simple sugar cookies made special through careful icing design and are perfect for parties or special treats.

Ingredients
- Sugar cookie dough
- Two different colored icings
Instructions
Roll and cut the cookies into squares. Bake and let them cool completely. Cover the cookies with one color of icing and let it dry.
Then use another color to draw lines vertically and horizontally to create small squares.
Fill alternating squares so it looks like a tidy checkerboard pattern. Let it dry completely before stacking or storing.
10. Oatmeal Raisin “Teacher’s Choice” Cookies
These hearty cookies are packed with oats and raisins, giving them a warm, homemade taste. They are chewy on the inside and slightly crisp around the edges. They’re wholesome and perfect for a quick snack during school days.

Ingredients
- 1¼ cups flour
- 1 tsp baking soda
- ½ tsp salt
- 1 tsp cinnamon
- ½ cup softened butter
- ½ cup sugar
- ½ cup brown sugar
- 1 egg
- 1 tsp vanilla
- 1½ cups old-fashioned oats
- ½ cup raisins
Instructions
Preheat the oven to 350°F (175°C). In a bowl, mix together flour, baking soda, salt, and cinnamon. In another bowl, cream together the butter and both sugars until fluffy. Beat in the egg and vanilla.
Slowly add the dry ingredients into the butter mixture, then stir in the oats and raisins until combined.
Drop spoonfuls of dough onto a baking sheet and bake for 10–12 minutes until golden around the edges. Allow them to cool in the pan for a few minutes before transferring them to a rack to cool completely.
11. Cereal & Oat Back-to-School Cookies
These cookies are filled with oats, cereal, and a mix of fun ingredients like coconut, nuts, or chocolate chips. They are filling and full of texture, making them a great after-school snack that gives some energy.

Ingredients
- 1½ cups flour
- 1 tsp baking soda
- ¼ tsp salt
- ½ tsp cinnamon
- ¼ tsp nutmeg
- 1 cup softened butter
- 1 cup brown sugar
- ½ cup sugar
- 1 tbsp milk
- 2 tsp vanilla
- 2 eggs
- 1 cup Raisin Bran or other cereal
- 2 cups old-fashioned oats
- ½ cup steel-cut oats
- 1 tbsp flaxseed (optional)
- 1 cup unsweetened flaked coconut
- ½ cup dried fruit or nuts
- 1 cup chocolate chips (optional)
Instructions
Begin by preheating your oven to 350°F (175°C). Mix the flour, baking soda, salt, cinnamon, and nutmeg in a bowl.
In another large bowl, cream the butter with the sugars until smooth. Add the milk, vanilla, and eggs, mixing until well blended. Stir in the cereal, oats, flaxseed, coconut, dried fruit, and chocolate chips.
Drop spoonfuls of dough onto a baking sheet and lightly flatten them.
Bake for about 12 minutes or until the edges turn golden. Allow the cookies to cool slightly before moving them to a cooling rack.
12. Everybody’s After-School Kitchen-Sink Cookies
These cookies are packed with everything from chocolate chips and oats to cinnamon and raisins. They are called kitchen-sink cookies because you can throw in almost any add-in you like. They have a comforting flavor and satisfying texture.

Ingredients
- Butter
- Sugar and brown sugar
- Eggs
- Vanilla extract
- Flour
- Oats
- Baking soda
- Cream of tartar
- Salt
- Optional add-ins: raisins, chocolate chips, spices
Instructions
Set your oven to 350°F (175°C). In a large mixing bowl, cream together the softened butter and both sugars until light and fluffy.
Add the eggs and vanilla and continue mixing until smooth. In a separate bowl, whisk together the flour, oats, baking soda, cream of tartar, and salt.
Gradually combine the dry ingredients with the wet mixture.
Gently fold in your chosen add-ins like chocolate chips, raisins, or cinnamon. Drop spoonfuls of dough onto a baking sheet and bake for about 10–12 minutes until the edges are just golden. Let the cookies cool on the sheet before transferring to a wire rack.
Conclusion
Back-to-school cookies are more than just sweet treats—they are little symbols of celebration, encouragement, and care.
From colorful pencil and crayon cookies to nourishing oatmeal creations, these recipes are perfect for marking a new school year with warmth and creativity.
Baking these cookies can become a fun family activity and a way to share happiness with teachers and classmates.